I recently discovered something that completely caught me off guard. For years, I avoided writing UI tests in my Android projects because running them required an emulator. That meant slow feedback, flaky CI pipelines, and a lot of manual steps. I use GitHub Actions for most of my projects, but stable Compose UI tests on a remote runner felt impossible, so I simply did not write them.
The irony is that the few times I forced myself to run UI tests locally, I actually found real UI bugs. The problem was not the value of UI testing; the problem was the workflow. If I needed to launch an emulator every single time, I would always postpone the tests until later, and “later” rarely came.
Then I discovered that Compose UI tests can run as plain unit tests on the JVM using Robolectric.
No emulator, no device, no waiting—just pure JVM execution. I felt genuinely shocked. It is the kind of discovery that makes you stop and rethink your entire workflow, because suddenly the thing that always felt slow and painful becomes fast and automatic. It felt like finding a hidden shortcut on a racetrack, the kind that takes seconds off every lap.
This changes a lot. If I didn’t know this until recently, I guarantee others are in the same situation.
🚦 Why UI Testing Felt Impossible Until Now
Jetpack Compose modernized UI development, but its testing story always felt heavy. Traditional Instrumented Tests (androidTest) required:
- A running emulator or physical device.
- Slow boot times and APK installation.
- Flaky CI execution due to memory constraints.
- Complex hardware acceleration setup for GitHub Actions.
This created friction and made UI testing feel like doing warm-up laps behind a safety car. The issue was not Compose itself; the issue was the execution environment.
🧩 The Missing Piece: UI Tests Running on the JVM
Robolectric also supports Compose UI testing directly on the JVM, letting you use the exact same testing APIs as instrumented tests (ComposeTestRule), but without the heavy Android OS overhead.
How Does It Actually Work?
You might be wondering, How can we test UI without a screen?
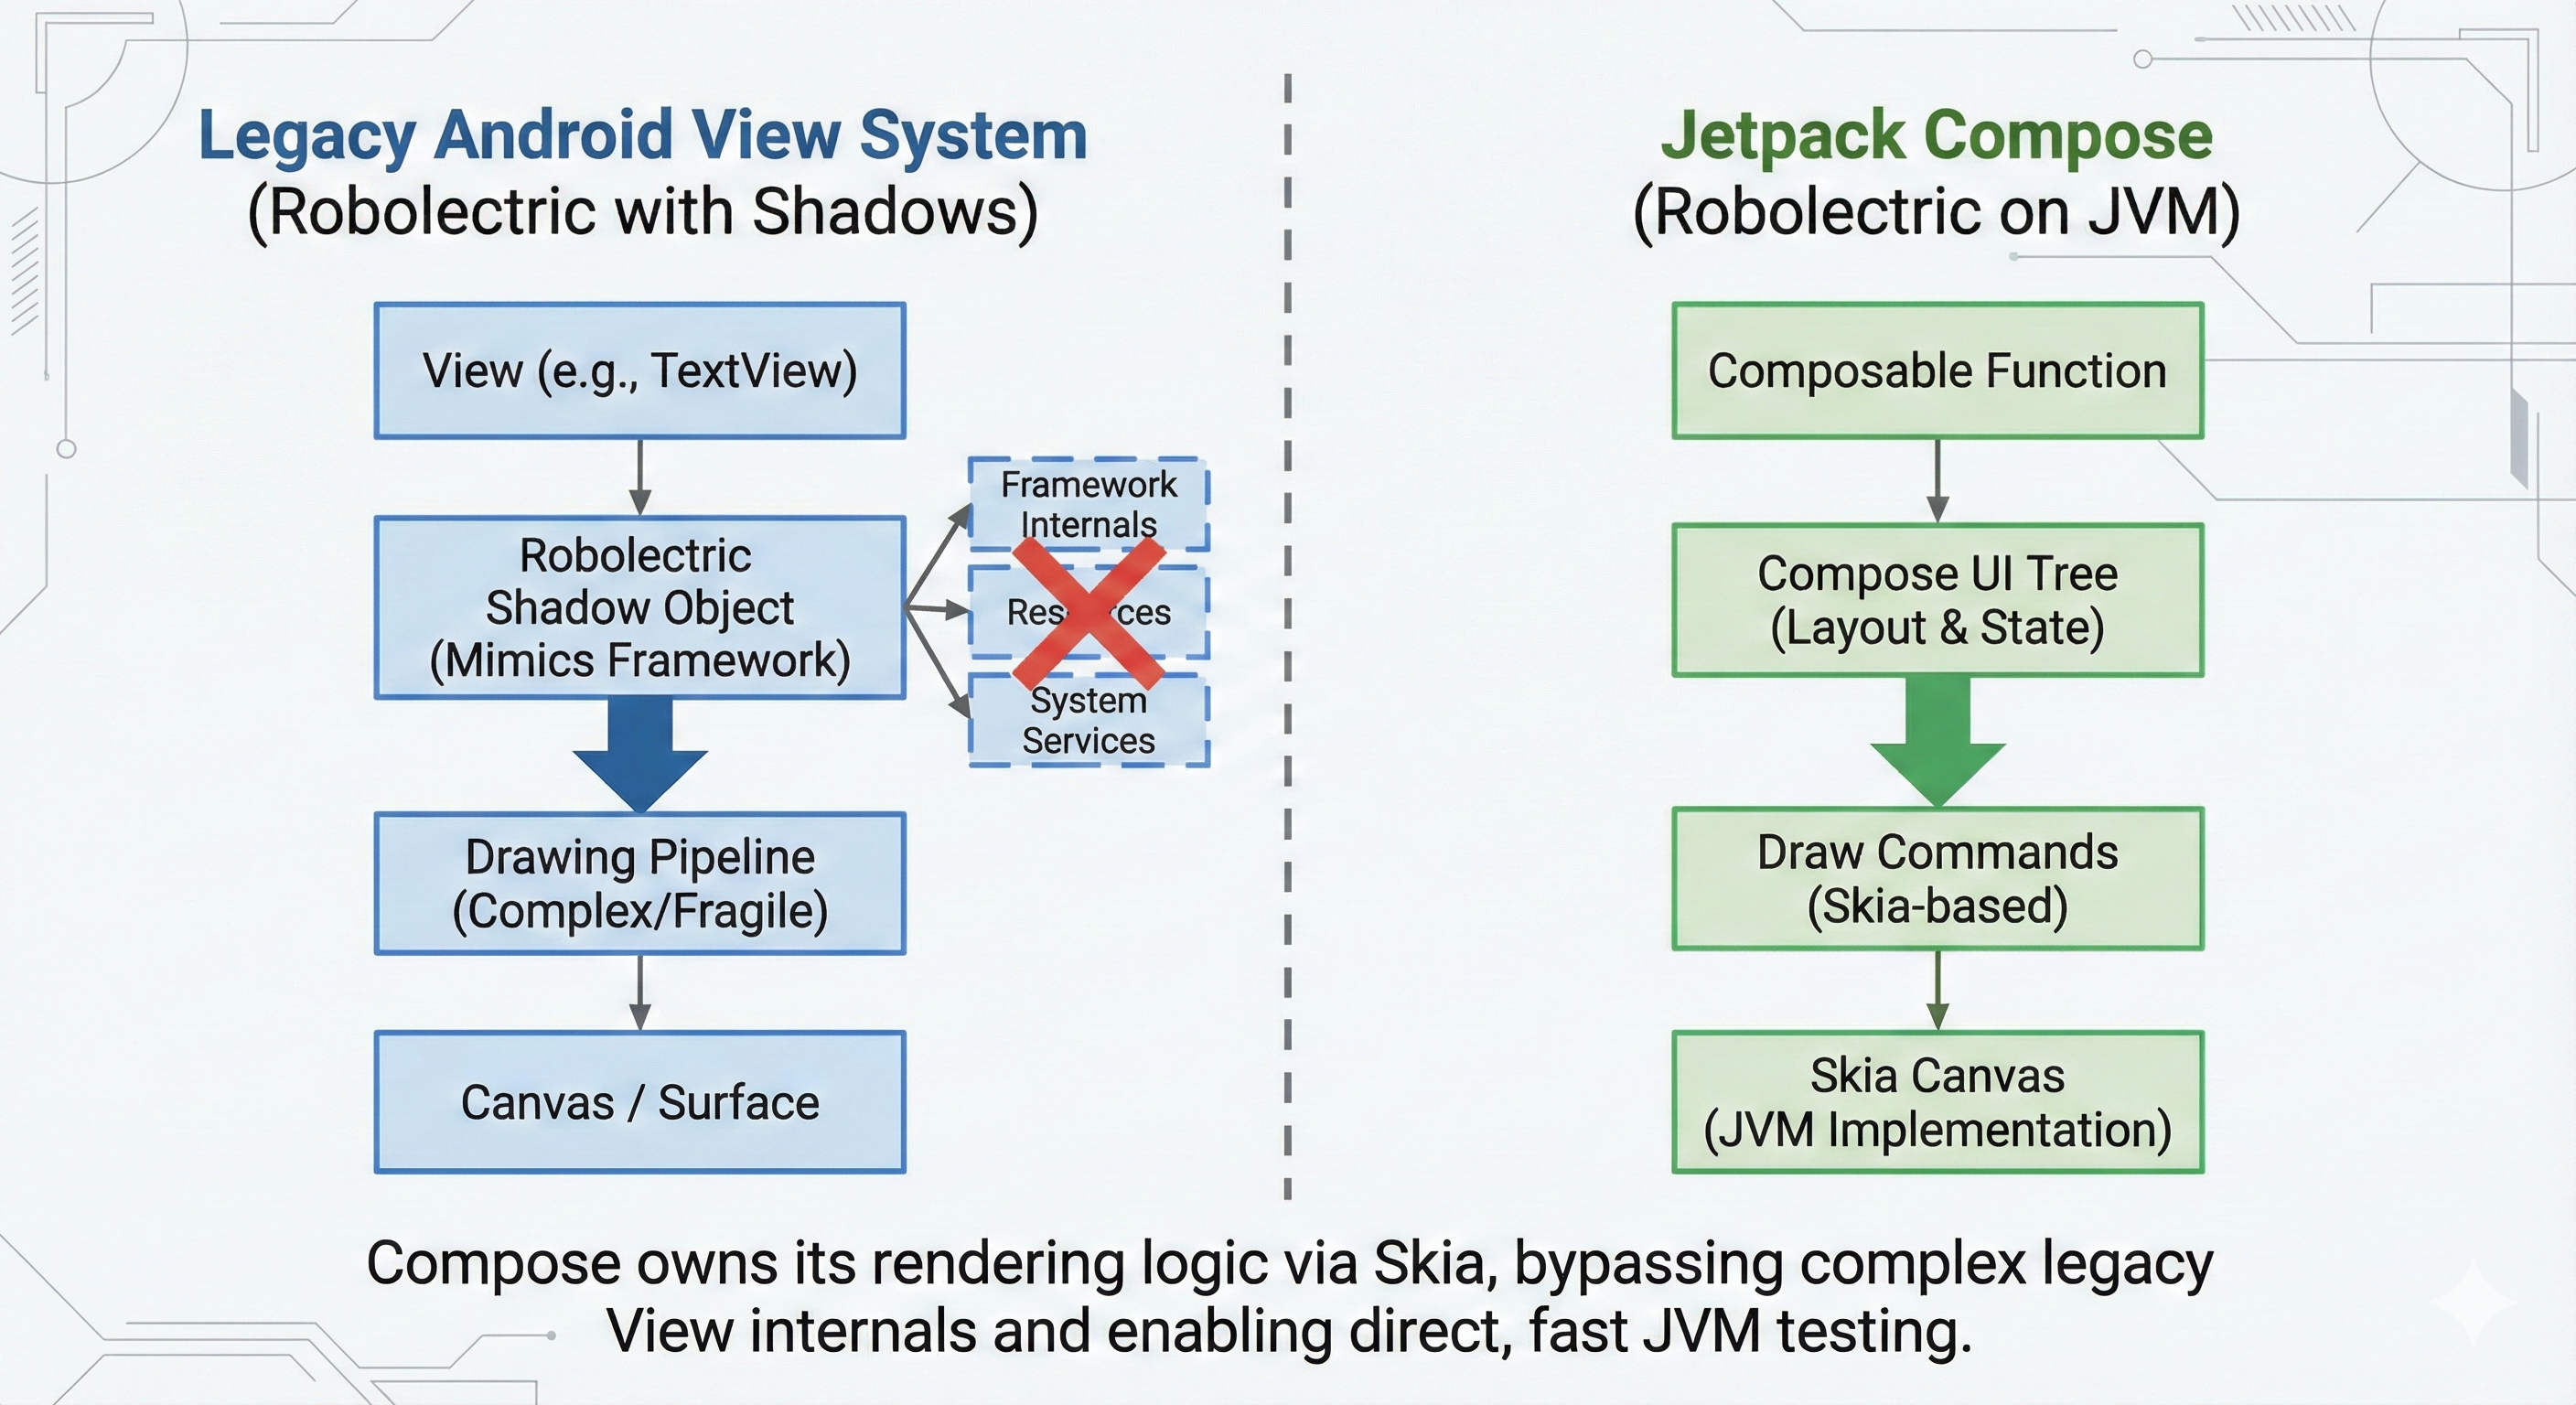
Historically, Robolectric had to create “Shadow” objects to mimic large parts of the legacy Android View system. Because Views rely heavily on framework internals, system services, and platform specific drawing behavior, this approach was fragile and often diverged from real device behavior.
Compose works very differently.
On Android, Compose does not render widgets via the legacy View drawing pipeline. Instead, it builds its own UI tree and records drawing operations into Android’s rendering infrastructure. Those operations are eventually rasterized by Skia, the same 2D graphics engine used by the Android UI toolkit itself.
Compose does not talk to Skia directly on Android. It draws using the Android Canvas and RenderNode system, which is backed by Skia under the hood. Because of this, Compose controls its layout, state, and rendering logic at a much higher level than Views.
This architectural separation is what makes JVM testing possible.
Robolectric does not need to faithfully reimplement dozens of View subclasses or low level drawing behavior. It mainly needs to provide a minimal window and rendering environment so that Compose can execute its own layout and draw phases. Since Compose manages most of the UI logic internally, the results are far more predictable and closer to what runs on a real device.
Benefits:
- Speed: Tests run in seconds, not minutes.
- Stability: No emulator crashes or timeouts.
- Fidelity: Because Compose owns its UI pipeline and relies less on legacy framework behavior, test results are very close to real device execution.
🔄 Comparing Instrumented Tests With JVM UI Tests
I migrated an existing test from androidTest to test, and the code difference was almost zero.
1. Instrumented version (Slow):
@RunWith(AndroidJUnit4::class)
class CounterInstrumentedTest {

    @get:Rule
    val rule = createAndroidComposeRule<MainActivity>()

    @Test
    fun counterStartsAtZero() {
        rule.onNodeWithTag("counter").assertTextEquals("Count, 0")
    }
}
2. JVM version with Robolectric (Fast):
@RunWith(RobolectricTestRunner::class)
@Config(sdk = [34])
class CounterJvmTest {

    @get:Rule
    val rule = createComposeRule() // Uses the generic Compose rule

    @Test
    fun counterStartsAtZero() {
        rule.setContent { CounterScreen() }
        rule.onNodeWithTag("counter").assertTextEquals("Count, 0")
    }
}
The Result: Same APIs, same assertions, same flow, but significantly faster execution.
⚙️ Setting Up Your Project
This requires minimal configuration in your module’s build.gradle.kts.
Dependencies:
dependencies {
    // Robolectric environment
    testImplementation("org.robolectric:robolectric:4.12.1")

    // The specific UI test dependencies
    testImplementation("androidx.compose.ui:ui-test-junit4:<compose_version>")
    testImplementation("androidx.test:core:1.6.1")

    // Optional: For assertions
    testImplementation("androidx.compose.ui:ui-test-manifest:<compose_version>")
}
Configuration: You must enable Android resources in your unit tests so Robolectric can load your themes and manifests.
android {
    testOptions {
        unitTests {
            isIncludeAndroidResources = true // 👈 This is mandatory, otherwise, tests will fail.
        }
    }
}
That is all you need.
🧪 Writing A Simple JVM Compose Test
The mental model is simple: It looks like a Unit Test but acts like a UI Test.
@RunWith(RobolectricTestRunner::class) // Robolectric Test Runner
@Config(sdk = [34])
class MyComposeTest {

    @get:Rule
    val rule = createComposeRule()

    @Test
    fun textIsDisplayed() {
        // Render the composable directly in the test
        rule.setContent { MyScreen() }

        // Use standard Compose testing finders
        rule.onNodeWithText("Hello World").assertExists()
    }
}
⚡️ Putting It All Together: The Complete Snippet
Here is a standard Compose interaction.
The Composable:
import androidx.compose.foundation.layout.Column
import androidx.compose.material3.Button
import androidx.compose.material3.Text
import androidx.compose.runtime.Composable
import androidx.compose.runtime.getValue
import androidx.compose.runtime.mutableStateOf
import androidx.compose.runtime.remember
import androidx.compose.runtime.setValue
import androidx.compose.ui.Modifier
import androidx.compose.ui.platform.testTag

@Composable
fun CounterScreen() {
    var count by remember { mutableStateOf(0) }

    Column {
        Text("Count, $count", Modifier.testTag("counter"))
        Button(onClick = { count++ }, Modifier.testTag("button")) {
            Text("Increment")
        }
    }
}
The JVM Test:
import androidx.compose.ui.test.assertTextEquals
import androidx.compose.ui.test.junit4.createComposeRule
import androidx.compose.ui.test.onNodeWithTag
import androidx.compose.ui.test.performClick
import org.junit.Rule
import org.junit.runner.RunWith
import org.robolectric.RobolectricTestRunner
import org.robolectric.annotation.Config
import kotlin.test.Test

@RunWith(RobolectricTestRunner::class)
@Config(sdk = [34]) // Run on a modern SDK
class CounterFeatureTest {

    @get:Rule
    val rule = createComposeRule()

    @Test
    fun verifyCounterFlow() {
        // 1. Render the UI
        rule.setContent {
            CounterScreen()
        }

        // 2. Initial State Verification
        rule.onNodeWithTag("counter")
            .assertTextEquals("Count, 0")

        // 3. Perform User Interaction
        rule.onNodeWithTag("button")
            .performClick()

        // 4. Verify State Change
        rule.onNodeWithTag("counter")
            .assertTextEquals("Count, 1")
    }
}
This executes instantly locally and creates a perfect feedback loop for TDD (Test Driven Development).
☁️ Running These Tests On GitHub Actions
This is where the ROI (Return on Investment) is highest. Because these are standard JUnit tests, you don’t need the reactivecircus/android-emulator-runner or hardware acceleration.
name: JVM UI Tests

on: pull_request

jobs:
  tests:
    runs-on: ubuntu-latest
    steps:
      - uses: actions/checkout@v3
      - uses: actions/setup-java@v3
        with:
          distribution: temurin
          java-version: 17

      # Runs all unit tests, including our Robolectric UI tests
      - name: Run Tests
        run: ./gradlew testDebugUnitTest
⚠️ What Robolectric Cannot Do
Robolectric is powerful, but it is not a 1:1 replacement for a physical device. It is a simulation.
✅ What works perfectly:
- Verifying UI state presence (Text, Buttons, Lists).
- Navigation logic and back-stack behavior.
- Theme application and resource resolution.
- Input injection (Clicks, Text input).
❌ The Limitations:
- Native Libraries (NDK): If your UI relies on a library that loads C++ code (like specialized PDF viewers or map SDKs), Robolectric will crash unless that library provides a no-op JVM version.
- Visual Fidelity (Screenshots): While you can take screenshots with Robolectric (using libraries like Roborazzi), the font rendering and anti-aliasing might differ slightly between the JVM and a real Android GPU.
- Hardware Sensors: Bluetooth, GPS, and Biometrics are simulated. You are testing your reaction to these APIs, not the APIs themselves.
My recommendation: Use Robolectric for 90% of your logic and flow testing. Reserve Instrumented Tests for the final 10% that requires pixel-perfect rendering or hardware integration.
💡 Best Practices For Stable JVM Compose Tests
- Isolate Business Logic: Don’t test your ViewModel in a UI test. Test the UI’s reaction to the ViewModel state.
- Use
testTag: Strings change, designs change, but semantic tags should remain stable. - Don’t Sleep: Never use
Thread.sleep(). Compose tests have their own internal clock synchronization. - Keep it in
test: Remember, these files go intosrc/test/java, notsrc/androidTest/java.
🏁 Final Thoughts
This discovery genuinely changed my loop. Running Compose UI tests on the JVM removes friction, improves CI reliability, and makes UI testing something you can finally do every day, not once in a while.
More importantly, this works because of how Compose is designed. By owning its UI tree, layout, and rendering logic, Compose does not depend on the fragile parts of the legacy View system. JVM testing is not a hack or a shortcut, it is a direct consequence of the architecture.
Compose did not make JVM UI testing possible by accident, it made it inevitable by design.
If you use Kotlin Multiplatform or standard Android with Compose, this upgrade will improve your development speed and reliability immediately.
📱 New: The KMP Bits App
If you want an easier way to read articles like this, I just released the KMP Bits mobile app, built entirely with Kotlin Multiplatform. It makes reading and navigating content much faster.
You can follow along and stay updated directly in the app:
➡️ App Store | ➡️ Google Play
If you enjoyed this article:
- Follow KMP Bits for more Kotlin and KMP content.
- Check out the app for a better reading experience.
- Share this article if you think others might benefit from it.
Thanks for reading, and see you on the next lap.
Comments
Loading comments...